Cithrel’s Fall is the first Capstone Dungeon in Fellowship. Completing it on time is crucial if you want to progress to the next league, the Adept, which offers better gear and more talent points.
Full Cithrel’s Fall Boss Walkthrough Guide
Cithrel’s Fall is very different from the regular dungeons you’ve run before. It’s longer, with a 27:51-minute time limit. If you don’t finish on time, you still get loot, but you won’t unlock the next tier.
You’ll also face three bosses instead of one, plus the dungeon has a “kill score” requirement. Each boss is tougher than anything you’ve encountered before, so this guide focuses on strategies for the three bosses.
How to Beat Nook, the Betrayer

At the first intersection of the dungeon, you can go left or right. Left leads to Nook, the Betrayer, and right to Ancient Koros. Most players find Nook easier, so going left first is recommended.
Key mechanics to watch for:
- Razor Traps: Nook spawns traps around the arena. Stepping on them causes massive damage, which can be fatal if combined with other attacks.
- Betrayer’s Arrow: A targeted attack that explodes after a delay. Stay away from allies when targeted and keep close enough for the healer to reach you. Move only after the explosion.
Most dangerous attack:
- Cold-Blooded Twist: The arena is divided into 10 sections; 5 are covered with deadly mist that damages over time. These sections alternate, so you must rotate carefully as the attack spins.
After the twist, Nook uses Arcane Volley, which deals massive damage to all allies. Healers should be ready, and Sylvie players should use Pink Flutterflies or Fluttercall: Heal for group healing.
Mid-fight, Nook summons three Eldrin Sentinels. The tank should taunt them, and the party should cleave them down quickly. Nook cycles through these mechanics until defeated.
How to Beat Ancient Koros
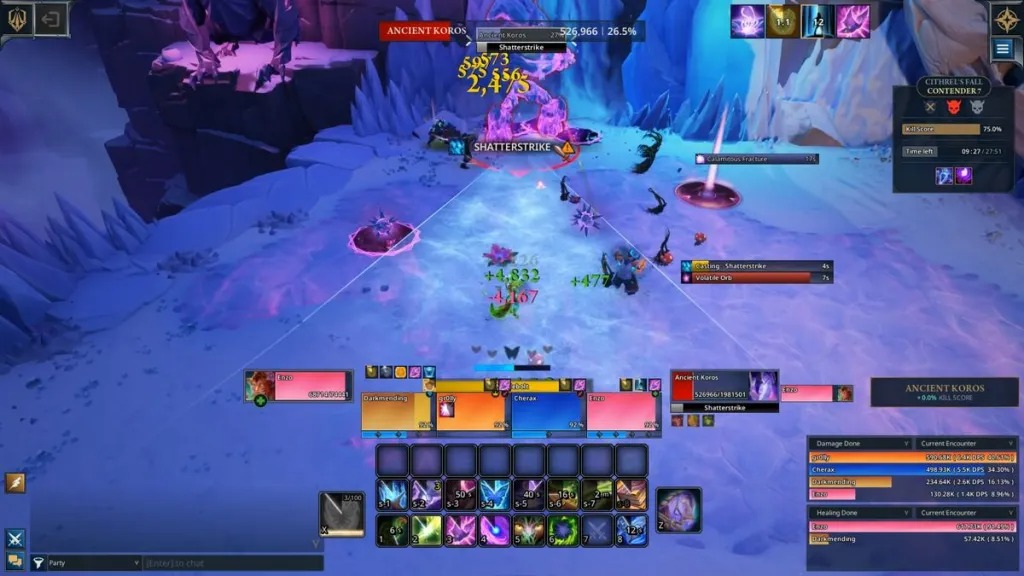
Ancient Koros is likely the toughest boss in the dungeon, but it becomes manageable once you understand the mechanics. Good positioning and spacing are key.
Mechanics:
- Volatile Orbs: These virus-like objects chase players and pulsate, dealing damage. They’re slow, but multiple orbs can become chaotic.
- Shatterstrike: A targeted cone attack that deals moderate damage and destroys Volatile Orbs. If targeted, move the cone to hit orbs. If not targeted, avoid it and try to gather orbs in one area.
- Calamitous Fracture: Spawns a random void circle that detonates, creating a damaging void. Players must “soak” the circle to control placement. Avoid soaking two consecutive fractures, or it’s lethal.
Mistakes here can be fatal, especially if the party isn’t properly geared.
How to Beat Cithrel

Cithrel is the final boss, with dangerous mechanics that require coordination.
Path to Oblivion:
- Cast on a random non-tank player. A meteor strikes after a few seconds, and the party must spread the damage evenly.
- After impact, a secondary explosion occurs, shrinking the arena until only the central platform remains.
Bloodhunt + Maelstrom combo:
- Bloodhunt: Marks two random players for a dash attack. Slashes everything in the path, dealing moderate damage.
- Maelstrom: Pulls all party members toward Cithrel, making it harder to dodge Bloodhunt.
Strategy:
- Marked players should move to the opposite corner of the boss.
- Non-targeted players stay near the boss but shift sideways to avoid the dash.
- Tank should keep Cithrel near the edge to protect the party from Breath of Al’zerac.
Repeat these mechanics 3–4 times until Cithrel is defeated. Even if you fail the timer, you’ll still get Adept (blue) gear from Cithrel’s Fall.
Cithrel’s Fall is challenging, but understanding these mechanics and coordinating as a team will ensure you conquer the dungeon and unlock the next league.